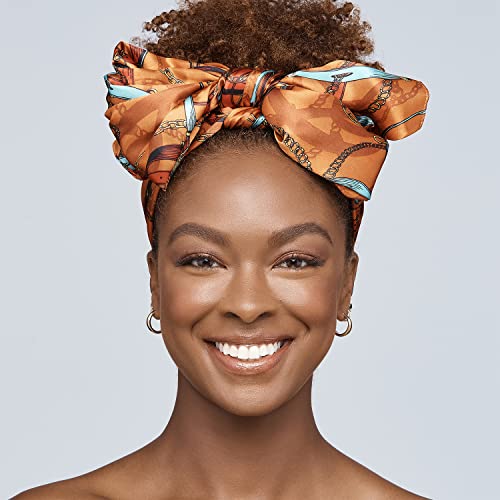
Do you long for a contoured makeup look? With the mixing of different shades and highlighting, contouring can help you achieve a sculpted and professional look every time. Many individuals wonder “what brush to use to contour?” Not knowing what brush to use to contour for each step of the process is one thing that stops a lot of individuals from giving it a try.
Today, we’re going to help you address any confusion you may have and explain which brush you should use for each step. Keep reading; we think you’ll find the information shared below to be very helpful.
Table of Contents
- What Type of Brush Do I Use for Contouring?
- The Best Contour Brushes to Add to Your Makeup Kit
- Choosing the Right Brush for Contouring
- FAQs
What Type of Brush Do I Use for Contouring?
The first step in learning how to contour is to understand which brushes you’ll need in your makeup kit. In the next few sections, we’ll outline the basic steps for achieving a contoured makeup look and explain the different brushes that you’ll need to complete each step.
Base Highlight
Before we jump into discussing what brush to use for contour and color correcting, let’s not forget the first step, which is to apply foundation and concealer to your face. Start with your normal foundation to make your face a blank canvas for the contouring that is to come.
After your foundation and concealer are finished, it is time to start the contouring process. Use a tapered highlighter contour brush first to apply more foundation that is about one shade lighter than the foundation base you already have on.
With the tapered highlighter contour brush, apply the lighter foundation to the areas beneath your eyes and along your forehead’s central V. Dip the brush in water first, tap off the excess and then dip it into the foundation. You only want a small amount of foundation for each of these steps and you must work carefully and evenly.
Precision Highlighting and Contouring
The next step in the process is to complete the precision highlighting and contouring along the bridge of your nose and the upper brow bone on your forehead. What brush to use for nose contour and brow contour? You’ll want to use a precision-angled contour brush
for this. Start with the lighter highlighter color, followed by the darker color.
After applying the light and dark shades along your nose and upper brow, blend them together. In case you still have a question about what brush to use to blend contour, the precision angled contour brush that you just used to apply the highlighter and contour to your nose and brows will continue to be the best choice for this step. Use small circular motions to blend the two shades along the edge of your nose and your brows.
Sculpting the Jawline and Cheeks
Next, it is time to begin sculpting your jaw and cheeks. Whether you’re wondering what brush to use for cream contour or what brush to use for powder contour, the answer will be the same for this step. The flat contour brush is the best choice to help you with sculpting your cheeks and jawline.
Use just a small amount of liquid or cream contour. Working with the flat contour brush at an angle, apply the contour right along your jawline and cheekbones. Work from the inside of your face out toward the sides.
If you prefer contour powder, pick up just a small amount of powder on the brush, tap off the excess, and move the flat contour brush in the same motions as described for using liquid or cream contour.
Applying Blush
We’re getting closer to completing our contoured makeup look. Next up is blush. To apply blush, work with a round angled contour brush, starting above your cheekbones. Use short but relatively quick strokes with the brush at an angle to apply the blush to your cheekbones.
Final Touches for a Natural-Looking Finish
Finally, if you’re looking for a natural-looking finish, you’ll want to use a fan contour brush. Dip the fan contour brush in the powder and tap off the excess. Work at a 45 degree angle to apply the powder along the same line on your cheekbones where the blush was applied. Use longer strokes until you achieve the look you’re after.
That’s it! Now you know how to contour and what brush to use for contouring.
The Best Contour Brushes to Add to Your Makeup Kit
Knowing which brush types you’ll need to contour is important, but it is just the first step. The next step is making sure that you choose high-quality brushes that will perform as you wish and will last for a long time. Below are some of our favorites for the various brush types mentioned above.
- Best Contour Brush Set: Lamora Pro Face Contour Brush Set
- Best Tapered Highlighter Contour Brush: e.l.f. Cosmetics Small Tapered Brush
- Best Precision Angled Contour Brush: Beauty Junkees Kabuki Nose Contour Brush
- Best Flat Contour Brush: Real Techniques Sculpt & Shape Dual Ended Makeup Brush
- Best Round Angled Contour Brush: Keshima Angled Blush Brush
- Best Fan Contour Brush: Pippa of London Studio FX Fan Highlighter and Contour Brush
| Product | Name | Price | Prime | Buy | Buy |
|---|---|---|---|---|---|
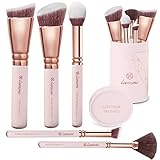 | Lamore Pro Face Contour Brush Set | PrimeEligible | Buy On Amazon | Buy Lamore Pro Face Contour Brush Set On Amazon | |
| e.l.f. Cosmetics Cosmetics Small Tapered Brush | PrimeEligible | Buy On Amazon | Buy e.l.f. Cosmetics Cosmetics Small Tapered Brush On Amazon | ||
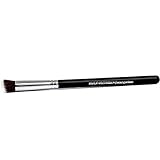 | Beauty Junkees Mini Flat Angle Contouring Makeup Brush | PrimeEligible | Buy On Amazon | Buy Beauty Junkees Mini Flat Angle Contouring Makeup Brush On Amazon | |
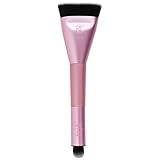 | Real Techniques Sculpt & Shape Dual Ended 2-in-1 Makeup Brush | PrimeEligible | Buy On Amazon | Buy Real Techniques Sculpt & Shape Dual Ended 2-in-1 Makeup Brush On Amazon | |
 | Keshima Angled Blush Brush | PrimeEligible | Buy On Amazon | Buy Keshima Angled Blush Brush On Amazon | |
 | Pippa of London Studio FX Fan Highlighter Brush | PrimeEligible | Buy On Amazon | Buy Pippa of London Studio FX Fan Highlighter Brush On Amazon |
Choosing the Right Brush for Contouring
Now that you’ve learned the basics for how to contour and which brushes you need for contouring, are you ready to give it a try? Remember, everything takes some time to learn, so give yourself some grace and plenty of practice time if you don’t get it perfect right off the bat.
Learn more about contouring and choosing the best makeup brushes with these related posts on our blog:
- Best Drugstore Contour
- What is a Tapered Face Brush Used For
- How to Use a Flat Foundation Brush
- What Makeup Brushes are Used for What
- How to Choose Quality Makeup Brushes
FAQs
Can I use a powder brush for contour?
Yes, a powder brush can be helpful when contouring. It can help to blend the contour around on your face and ensure that you achieve the look you’re after.
What brush do u use to apply contour and highlighter?
A precision angled contour brush can help you apply contour and highlighter to your face.

Thanks, Ashley!
I love how you break it all down here- it can be so confusing for beginners!
-Ashley